Index Menu
Back
Main Menu
Forward
 
TUTORIAL: How to Create a Professional Super Mosaic
 
                                    P  R  E  M  I  S  E
First of all a few of History.  The origins of the Mosaic Art lose in the mists of times. The 
Sumerians, the Egyptians and the Pre-Columbian Civilizations of South and Central America and 
of Mexico too  utilized the Art of Mosaic,  with various techniques.  In Greek Age the Mosaic 
becomes one of the most refined forms of Art and succeeds even in replacing the typical Greek 
Painting with Casel.  The period of maximum splendor of Mosaic Art was in Roman Age.  In fact 
in the Ancient Rome  the Mosaic spreads fully both as Wall Mosaic  and  as Floor Mosaic.  The 
subjects  mainly depicted  are Still Lives,  Mythological-Historical Events,  but Geometrical 
Patterns too.  The most used Materials are Tesserae of Onyx and of Vitreous Pastes,  but also 
Tesserae of  Limestone Rocks and of Coloured Marbles. The Size of Tesserae was variable:  the 
Greeks utilized very small-size Tesserae,  the Romans instead utilized small  and medium-size 
Tesserae,  according to the use of the Mosaic.  In Roman Age the Main Types of Mosaic were 5: 
1 - OPUS SIGNINUM: Floor Mosaic.  Tesserae with white cross-shaped variants or Tesserae mixed 
with big fragments of Terracotta. 
2 - OPUS SECTILE: Floor Mosaic.  Coloured Stone Slabs  with  several shapes  and  dimensions. 
3 - OPUS TESELLATUM: Floor Mosaic.  Big Square or Rectangular Tesserae, all of the same Size, 
used almost always to compose symmetrical and regular Patterns. 
4 - OPUS VERMICULATUM: Floor and Wall Mosaic. Small and of various colors and forms Tesserae, 
arranged in order to create a composition with pictorial characteristics.  This technique was 
often used to create a Square placed on the center of the floor, called Emblem, as it happens 
also in some kind of Carpets. 
5 - OPUS MUSIVUM:  Wall Mosaic.  Small and medium-size Tesserae. It represents the Mosaic for 
Vaults and Walls and uses almost always Tesserae of Vitreous Paste. 
In the Ancient Rome, the different types of Masters of the Creation of Mosaics  were Four and 
everyone of them had a specific job: 
A - PICTOR IMMAGINARIUS: He was the Cartoon Master.  He traced  on a cardboard  the design in 
order  to represent  it  after  with the Mosaic,  and  suggested  also  the necessary colors. 
B - PICTOR PARIETARIUS: He was the Artist who copied the design from the cardboard to wall or 
to floor,  magnifying  the figures  in proportion  to the surface  to cover  with the Mosaic. 
He calculated also the distances between the several figures, that he adapted to the form and 
the size of the wall or floor to cover. 
C - PICTOR MUSIVARIUS: He was the Artist  who executed  the Wall Mosaic, called Opus Musivum, 
on Vaultes and Domes. He was a great connoisseur of the technical properties of the materials 
he used after to obtain particular and personal effects. 
D - PICTOR TESSELLARIUS: He was the Artist who executed Floor Mosaic, called Opus Tessellatum 
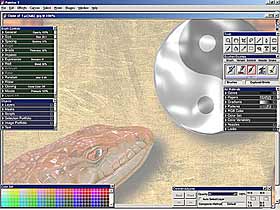
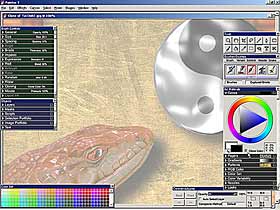
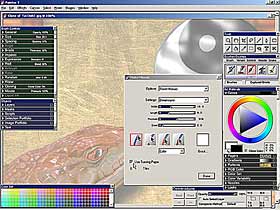
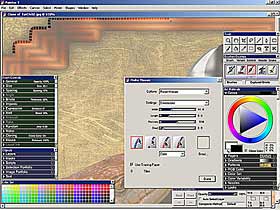
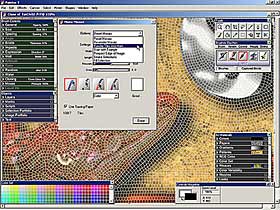
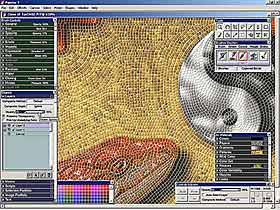
The Program  used  for  this Tutorial  is  Fractal Painter ©,  from  the Corel Corporation ©. 
This tutorial is written for PC, but with the alternative keys is valid also for MacIntosh ©. 
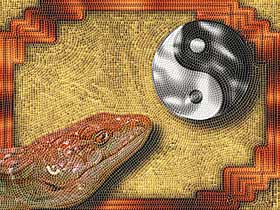
If you click  with left mouse  on image  by side  of text  you will see it to more dimension. 
                                 P  R  O  C  E  D  U  R   E

This tutorial uses partially  the original techniques of 
the Classic Mosaic. The First Phase is the one to act as 
the PICTOR IMMAGINARIUS and to make a design or an image 
that will be the basis of the Mosaic.  I suggest to make 
a refined and coloured image,  so it will be possible to 
approach the final phase of the Tutorial too. If you are 
not able  to create a your image,  you can also to use a 
good scanned Photo. Images with tenuous or pastel colors 
will give the best results. Therefore in tutorial I will 
utilize a my old image entitled Tai-Chi with new colors. 
The basic image  must be large 1200x900 Pixels at least. 
Image01
Image02

 Open (CTRL+O)  the basic image  of your Mosaic.  In this 
 tutorial  we utilized  the image "TaiChi.jpg".  Click on 
 File/Clone. Go on "Clone of TaiChi"  and click within in 
 order activating it.  Control that  File/Clone Source is 
 set on "TaiChi.jpg".  Click on  Select/All (CTRL+A)  and 
 Cancel all with the Delete Key, or Edit/Cut (CTRL+X), or 
 Edit/Clear.  Click on Tracing Paper Icon in the Frame of 
 your Document (up on right),  or click on Canvas/Tracing 
 Paper (CTRL+T). 

Open  Art Materials/Colors  and  Click on  Clone  Color. 
In this way the Colors  of the Basic Starting Image will 
be  automatically  sampled  from  Fractal Painter  to be 
reproduced  exactly  in the corrisponding parts  of  the 
Mosaic you must now create. 
Image03
Image04

 Click on Canvas/Make Mosaic to open the relative Window. 
 The first thing you must make is to click on Use Tracing 
 Paper, if it is Disabled. Width and Lenght establish the 
 size of every tessera of the Mosaic. A Width = 10 Pixels 
 and an Height = 8 Pixels Size  could be  a good starting 
 size. Pressure option  determines  the Variation of Size 
 of Tessere  according to the Pressure exercised with the 
 Pen of your Tablet. 

Click on the First Icon from Left in order to create the 
Tesserae of your Mosaic, following the homogeneous areas 
of Color on Cloned Image.  Use the Second Icon from Left 
in order  to Cancel  the Tesserae  of Mosaic  badly set. 
Click on the  Grout Icon in order to change the Color of 
the Grout,  that is  the material  between the tesserae. 
Generally,  except special cases, a Middle-Light Gray or 
a  Light Beige  are  good  basic  colors  for the Grout. 
Image05
Image06

 The Main thing to keep in mind is that in positioning of 
 Tesserae you must follow the Lines of Force of the Basic 
 Image.  You must therefore find them before beginning to 
 put down the Tesserae and then you must follow them in a 
 enough precise way. This is really important.  The Lines 
 of force are the Lines  and  the Curves  along  which an 
 object of a composition  extends itself  and  not always 
 they coincide  with the contours of the same object.  In 
 order to help to understand you better, here on Side you 
 can see designed the main Lines of force of the "TaiChi" 
 Image  used  in this tutorial.  Here the Lines  of Force 
 first only on the draw of the image. 

Here they are the same Lines of Force,  but this time on 
the Final Basic Image.  Look really  with care  both  at 
the image by side and at the previous image, so that you 
can understand if it is more easy for you to extrapolate 
the Lines of Force from the First Draw  or from the Full 
Coloured Starting Basic Image.  Remember  also  that you 
must not draw  the Lines of Force  on the Basic Starting 
Image, that is the Clone Source Image,  but you can draw 
them on another copy of the image and then you can print 
this image,  so that you can to look up it, if you must, 
while you are building your Mosaic. 
Image07
Image08

 Continue to put the Tesserae of the mosaic.  If mistake, 
 click on  the second icon  from left  in the Make Mosaic 
 window, cancel wrong Tesserae,  click again on the first 
 icon from left and continue to put Tesserae. It's really 
 easy and amusing!  Remember  that  the Undo (CTRL+Z) and 
 Redo (CTRL+Y) options are working also if the respective 
 voices in the Edit Menu  are disabled,  you must only to 
 use the commands from keyboard. 

Sometime the presence of the image-guide,  thanks to the 
Tracing Paper option, can give problems in some parts of 
the Mosaic. Then it's sufficient to click on Use Tracing 
Paper to disable in this way the tracing and continue to 
work without Tracing Paper, but with the option of Clone 
Color again enabled,  and,  when the point of the Mosaic 
that gave problems is solved, click again on Use Tracing 
Paper, restoring the Tracing Paper option  and  resuming 
to work on your Mosaic! 
Image09
Image10

 Remember  that you  do not have to end the mosaic in one 
 session,  but you can save it and continue to work on it 
 later. But remember well that if you interrupt your work 
 you must first click on Done  and  then save your Mosaic 
 in format ".RIFF".  In order to resume the job later on, 
 you must  before  load  also the Basic Image,  and after 
 load image ".RIFF"  with  the Mosaic  partially applied, 
 therefore indicate  in File/Clone Source the Basic Image 
 as Clone Source,  then  click  on  Art Materials/Colors/ 
 Clone Color  and  click on Canvas/Tracing Paper, finally 
 click  on  Canvas/Make Mosaic   and  continue  to  work. 

Every 10 minutes click on Done and save Mosaic in format 
".RIFF", then click on Canvas/Make Mosaic to work again. 
When Mosaic is ended, in Make Mosaic Window, Click, into 
the Options Down Arrow Button,  on "Rendering Tiles Into 
Mask". Click on Done.  Remember too that Fractal Painter 
renders the Mosaic Tesserae  in Vectorial Form,  so that 
you can resize them without loss of resolution. You must 
follow exactly this procedure  to obtain  a such result: 
A - Create your Mosaic and,  at the end,  Click on Done. 
B - Click on Canvas/Resize, Deselect Constrain File Size 
and  insert  an Higher Resolution (300 PPI or such). The 
Mosaic  will resize  itself,  but with Blurred Tesserae. 
C - Click on Canvas/Make Mosaic. Select Re-Render Mosaic 
and the Blurred Tesserae  will be rendered  to the right 
Resolution, becoming well Sharp. Click on Done and Save. 
Image11
Image12

 Select  Effects/Surface Control/Apply  Surface  Texture. 
 Click  on Using/Mosaic Mask. In this way an High 3D Deep 
 will be add to your Mosaic. If you aren't satisfied from 
 the Default result,  you can also adjust  the Parameters 
 as you like more, looking at your modifies in the little 
 Preview Window. At the end Click OK. 

Now it's necessary a few of Post-Production Job, so that 
this Simulation  of Mosaic  can be  always more like the 
Reality. So go on the Clone Source, that is "TaiChi.jpg" 
and Click on Select/All (Ctrl+A). Now Click on Edit/Copy 
(CTRL+C).  Go on Clone of TaiChi and Click on Edit/Paste 
(CTRL+V). After in Objects/Layer click 2 times fastly on 
Layer 1,  that is on the New Layer  you will find there, 
with within the Image of the Clone Source. You will open 
so the Window of Layer Attributes. Set Top=0 and Left=0. 
You have so centered perfectly the 2 images,  the one of 
Layer 1 and the one of Canvas.  Now you can deselect the 
Canvas/Tracing Paper (CTRL+T). 
Image13
Image14

 Now you must give a few of Brightness to your Mosaic, so 
 in Objects/Layers Select  and  Activate  the Layer 1 (It 
 Becomes Blue  and  with the Icon of an Open Eye). Always 
 in Objects/Layers Set Composit Method of Layer 1 on Hard 
 Light, with Opacity between 45% and 60% value. 

Now it's necessary to soften a little the Brightness you 
have just add,  so Click  again  on Edit/Paste (CTRL+V). 
In Objects/Layer click 2 times fastly  on Layer 2,  that 
is on the Second Layer,  also this with within the Image 
of Clone Source.  You will open  so  the Window of Layer 
Attributes.  Set Top=0 and Left=0.  You have so centered 
perfectly all the 3 images,  the one of Layer 2, the one 
of Layer 1, and the one of Canvas. Activate  the Layer 2 
(It Becomes Blue  and  it’s Icon is an Open Eye). Always 
in Objects/Layers, Let the Composit Method of Layer 2 on 
Normal, but change the Opacity between 25% and 40% value 
according to intensity of colors of your starting image. 
Image15
Image16

 Click  now  on Objects/Layers/Drop All to join all the 3 
 Layers in the Canvas Layer only and at the end save your 
 Mosaic,  with File/Save As, in the Format you like more. 
 Your mosaic  is now completed  and  if you have chosen a 
 suitable starting image  and  if  you have followed in a 
 correct way  the instructions  of this my tutorial,  you 
 will have  obtained  a good Professional Simulation of a 
 Mosaic!  Here on left side  you can see  the Final Image 
 of the Mosaic  of this tutorial  fully completed.  Click 
 with  your left mouse  on the image  to see  it  better. 


Indietro
 
Avanti

I have written this page in Italian language and after I have translated it in English language.
If you find some my translation's error, excuse me and send me an e-mail with the correct version. Thanx !!
Please Remember That Everything On This Web Site Is Copyrighted.


All rights reserved. Copyright © 2000 by Francesco Franceschi.