Index Menu
Back
Main Menu
Forward
 
TUTORIAL: Nozzles, Nozzles and again Nozzles!
 
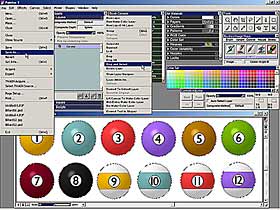
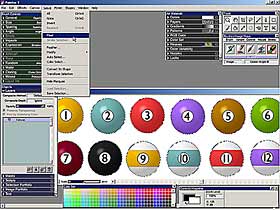
                                    P  R  E  M  I  S  E
In Fractal Painter ©  a Nozzle  is a particular type of Material located in the Art Materials 
Palette.  A Nozzle is simply an image with the extension .RIFF,  composed and subdivided into 
smallest images,  called Elements of the Nozzle. These Elements are individualized from Space 
Coordinates  and  they are spread on the Document on which you are working through a singular 
type of Brush,  called Image Hose.  The images into the Nozzles are indexed,  so that you can 
select some of the images that are in a Nozzle thanks to a particular Factor of Input, set up 
in Brush Controls/Expression (Direction, Velocity, Pressure  of the Pen on the Tablet, etc.). 
It is also possible  to apply from 1 to 3 Ranks on a Nozzle at the same time.  So there are 3 
types of Nozzles: 1, 2 and 3 Ranks Nozzles.  Everyone of these 3 types differs from the other 
both for the way it was created  and  for the different power of control that the User has in 
the Management of Nozzle.  This Tutorial  will check  these 3 Typologies of Nozzles Creation. 
The Program  used  for  this Tutorial  is  Fractal Painter ©,  from  the Corel Corporation ©. 
This tutorial is written for PC, but with the alternative keys is valid also for MacIntosh ©. 
If you click  with left mouse on images  by side of text you will see them to more dimension. 
                                  P  R  O  C  E  D  U  R   E
PART I: Rank 1 Nozzles
Before beginning the creation of every type of 1, 2 or 3 
Ranks Nozzles,  it is necessary  that  you first prepare 
the images  that  will compose  the Nozzle,  that is the 
Elements  of the Nozzle.  These Images must have all the 
same size of Height  and  Width and, if you want build a 
Nozzle in a Professional way, you must also select them. 
In this Tutorial they will be used Basic images, that is 
Elements, sized by 150x150 Pixels. The tutorial of first 
part will manage 6 Elements, so the starting size of the 
Nozzle will be: Width=900 Pixels (=150x6) and Height=150 
Pixels (= 150x1). 
Image01
Image02
 The simplest method  in order  to create  a Nozzle is to 
 use a Layer Group.  This Method can be ONLY used for the 
 creation of 1 Rank Nozzles. Make so: 
 01 - Open a new image (Untitled) with File/New (CTRL+N), 
 in this case of of 900 x 150 Pixels. 
 02 - Click on Canvas/Grid/Grid Options  and  set up  the 
 Size of Grid Cells, to Horizontal Spacing=150 Pixels and 
 Vertical Spacing=150 Pixels.  Left  Line Thickness to 1. 
 03 - Click on Canvas/Grid/Show Grid or click up to Right 
 on  the second small Icon  from the Top (Show Grid),  on 
 the Edge of the Window of the Current Image. 
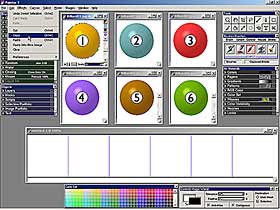
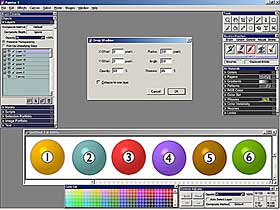
From now  the procedure of creation of the Nozzle changes partially if you want to design the 
Elements of the Future Nozzle directly when you're building the Nozzle. In that case make so: 
A - Click on Objects/Layers/New and create therefore Layer 1. 
B - Draw in the first square up on the left of the Grid  the First Element of the New Nozzle. 
C - Click on Objects/Layers/New and create therefore Layer 2. 
D - Go on so and create all 6 Elements. Then continue from point 10 of the tutorial. 
As in this tutorial instead you will use Images previously arranged, then go on so: 
04 - Click on the image that will be the First Element of 
your Nozzle,  that  is  Billiard01.jpg,  and  Select  its 
Contour. The best Tools in order to make this are 2: 
A - Select a Contour with Tool/Pen and the  Bezier Curves 
and after transform the Vectorial Shape in Selection with 
Shapes/Convert to Selection. 
B - Use, as in this case, Tools/Magic Wand and change its 
settings with Controls:Magic Wand according to the Image. 
After Click on White Color  near Edges  of Billiard01.jpg 
and invert the Selection with Select/Invert.  Copy all in 
memory with Edit/Copy (CTRL+C). 
Image03
Image04
 05 - Click on " Untitled-1 ",  that is  on  the building 
 Nozzle and then Click on Edit/Paste (CTRL+V)  and create 
 so Layer 1.  It  will put  at the center  of Untitled-1. 
 Move with Tools/Layer Adjuster the image of the Layer to 
 the First Square from Left of the Grid. 
 06 - Click on the image Billiard02.jpg, that will be the 
 second Element of your Nozzle and Select its contour, as 
 you made at Point 04.  Copy it  in memory with Edit/Copy 
 (CTRL+C). Repeat the Operations of the Point 05  and  so 
 create the Layer 2  in Objects/Layers.  Move the Layer 2 
 to the Second Square  of Grid with Tools/Layer Adjuster. 

07 - Repeat  all Operations  of Point 06,  changing from 
time to time the Basic Image of Nozzle Element, using so 
Billiard03.jpg, Billiard04.jpg, Billiard05.jpg  and also 
Billiard06.jpg.  Create  so  all the 6 Layers,  and move 
every New Layer  in the Successive Square  from Left  of 
the Grid  with Tools/Layer Adjuster.  Fill all the Grid, 
as  you  can see  in the Image  here  on the right side. 
Image05
Image06
 08 - Cancel the 6 single images, from Billiard01.jpg  to 
 Billiard06.jpg, from the desktop, as you don't need more 
 them.  Click on Canvas/Grid/Hide Grid  and so Deactivate 
 the Grid.  In Objects/Layers select the Layer 1 and then 
 Click on Effect/Objects/Create Drop Shadow.  Set up your 
 Shadow with the Parameters of this window.  Click on OK. 
 So in  Objects/Layers  you  will have created  the Group 
 Layer called "Layer 1 and Shadow".  Always with "Layer 1 
 and Shadow" selected,  click on  Objects/Layers/Collapse 
 and transform the Group Layer in a single Layer, but now 
 with Shadow.  The Layer  will turn  its name in Layer 7. 
 Repeat the Operations of this Point 08 for all the other 
 Layers, from Layer 2 to Layer 6, so that you will obtain 
 a series  of shaded Layers,  from Layer 7  to  Layer 12. 
09 - Create so all 6 Layers of the Nozzle, from Layer 07 
to Layer 12. Select all them, one by one, with mouse and 
with the Shift Key down on Keyboard. 
10 - Click on the Group button in Objects/Layers  and so 
create the Layer Group called Group 1. 
11 - With the Layer Group 1  enabled,  Click  in Brushes 
Palette on Nozzle/Make Nozzle from Group and the Nozzle, 
here  with  a Black Background,  will be created  on the 
Desktop. Click on File/Save As and Save it with the name 
of "Billiard_Nozzle_1Rank_Shadow.RIF". 
Image07
Image08
 12 - Close all images that are on your Desktop. Click on 
 Brush/Image Hose. Choose the Brush Variant you like more 
 too.  Click on File/New (CTRL+N) and open a new document 
 of 500x500 Pixels size.  Load your Nozzle  with Brushes: 
 Nozzle/Load Nozzle (CTRL+L).  Begin  Painting  with your 
 new Nozzle on the opened Document!  Now you can also Add 
 the New Nozzle  in permanent way to your Nozzles Library 
 with Art Materials/Nozzles/Add Nozzle To Library. You've 
 to understand that it's possible create an 1 Rank Nozzle 
 also without a Group Layer, as we will see in the second 
 part  of this tutorial.  You can execute  more easy this 
 part of Tutorial, downloading the file nozpic01.zip with 
 all images,  clicking here on the Right Icon Download .zip. 
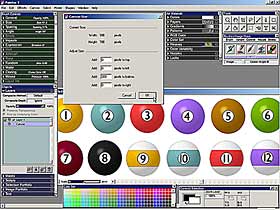
PART II: Rank 2 Nozzles
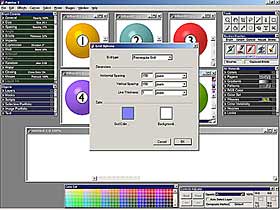
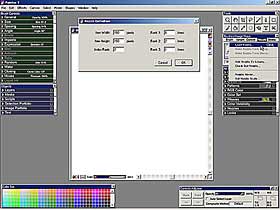
This new Procedure of Creation  of Nozzles is obbligatory for 2 Ranks Nozzles,  but it can be 
applied also to create an 1 Rank Nozzle.  In order to create a 2 Ranks Nozzle, you must go on 
mostly like the Procedures of Part I.  A 2 Ranks Nozzle foresees 2 different Factors of Input 
for the Management of the Nozzle  and it is take advantage of the Dimension of the Horizontal 
and Vertical Deployment  in order to determine the Membership of a Cell of a Nozzle to One or 
to the Other Rank,  so that it can be possible to manage them with One or the Other Factor of 
Input. The 1 Rank Nozzle refers to the Horizontal Deployment, while the 2 Ranks Nozzle refers 
to the Vertical Deployment. The Method of Creation of a such 2 Ranks Nozzle is the following: 
13 - Load  with File/Open (CTRL+O)  the Basic Images  or
Elements you need to create the New Nozzle. In this Part 
you need 12 Basic Images and if images are several as in 
this case,  it is better you open them on Desktop one at 
a time, when you need them. Open a new image, with File/
New (CTRL+N), Width=900 x Height=300 Pixels Sized. 
14 - Repeat  the Points  from 02 to 06 of this Tutorial. 
15 - Repeat a first time the Operations of the Point 06, 
changing  from time  to time  the Basic Image of Element 
of  the Nozzle,  using  Billiard03.jpg,  Billiard04.jpg, 
Billiard05.jpg  and  Billiard06.jpg. Create so all the 6 
Layers, moving with Tools/Layer Adjuster every new Layer 
in the Next Square from Left of the Grid, so that at the 
end you will have filled all the superior part  of Grid. 
Image09
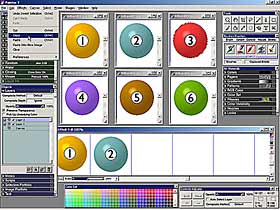
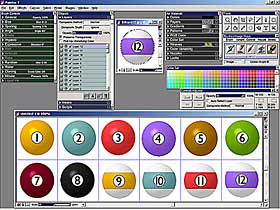
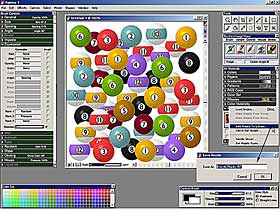
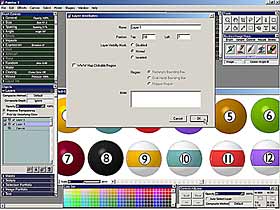
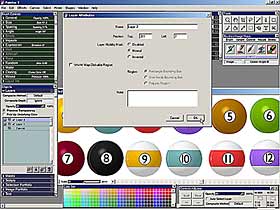
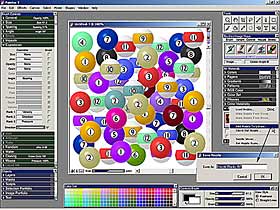
Repeat again  for the second time the Operations of Point 06,  changing from time to time the 
Basic Image of the Element of Nozzle,  using Billiard07.jpg,  Billiard08.jpg, Billiard09.jpg, 
Billiard10.jpg, Billiard11.jpg  and  Billiard12.jpg. Create so also the others 6 Layers, that 
is the ones on the Lower side  of the Grid. Move with Tools/Layer Adjuster every new Layer of 
this last Layers set to the Lower Squares of the Grid, always starting from Left, so that the 
Upper and the Lower parts of the Grid,  will be filled  as you can see  here  in Image above. 
Image10
 16 - Repeat the Operations of Point 08,  in order to add 
 the Shadow to the Layers, but now for the Layers from 01 
 to 12. The Layers will change again their name, when you 
 will have clicked on Objects/Layer/Collapse for everyone 
 of them and at the end  you will obtain  a shaded set of 
 Layers that go from Layer 13 to Layer 24. 
 17 - Create all the 12 Layers of the Nozzle  and  select 
 them with the mouse one by one, with the Shift Key down. 
18 - Click in the Lateral Menu of Objects/Layers on Drop 
and Select. 
19 - Click  on File/Save As  and  save  the Image of the 
Nozzle with the name of "Nozzle2Ranks.RIF".  Remember to 
save in Format ".RIF ". 
Image11
Image12

 20 - Close all the images  that are still opened on your 
 Desktop. Click on Brush/Image Hose and choose a Variant. 
 Click  on  File/New (CTRL+N)  and  open  a new image  of 
 500x500 Pixels. Click on Brushes:Nozzle/Load Nozzle and 
 select  the Nozzle File  you  have just saved,  that is 
 "Nozzle2Ranks.RIF". Click on Open. 
 21 - A window will open, where you must insert both the 
 Width and the Height of every Cell of the Grid, in this 
 case Item Width=150 and Item Height=150.  You must also 
 insert the Number of Ranks that has the Nozzle, in this 
 case 2 (Index Rank). Finally you must insert the number 
 of interested Cells for every Rank, so for this example 
 in the Rank 1 Square (Horizontal)  write  the Number 6, 
 in the Rank 2 Square (Vertical)  write the Number 2 and 
 in the Rank 3 Square leave the value of 1. Give the OK. 
22 - The 2 Ranks Nozzle  is  created  and  it is already 
active in memory, but as for Default is enabled only the 
Rank 1, in order to make operative also Rank 2, you must 
go to Brush Controls/Expression and set Rank 2 on Random 
or Velocity, or Direction, or Pressure or another of the 
possible options. Well, now put your Image Hose brush on 
the new image and begin painting with your new Nozzle!!! 
You can also Add the New Nozzle in permanent way to your
Nozzles Library  with the option  Art Materials/Nozzles/ 
Add Nozzle To Library. 
Image13
Remember  that  it  is possible  to create  an 1 Rank Nozzle  with the same system,  the only 
difference  is that  when the Windows  of Nozzle Parameters is opened and you start inserting 
the values normally, as explained at Point 21 of this tutorial, in Index Rank you must insert 
in Rank 1 (Horizontal) Square  the number 1,  in Rank 2 (Vertical) Square again the number 1, 
while  in Rank 3  you must leave the value of 1.  You can execute easy this part of Tutorial, 
downloading the file nozpic02.zip with all images, clicking here on the Right Icon Download .zip 
Image14
 23 - Paradoxically  the most important part  of a Nozzle 
 is just the Script  that is created  with the Parameters 
 you've seen to Point 12 of this tutorial. If you reload, 
 with File/Open, "Nozzle2Ranks.RIF"  as a single File.RIF 
 and  then  click on File/Get Info (CTRL+I), it will open 
 on your screen  a Window  with within the Command String 
 of  the  Nozzle,  in this case " image hose 6 by 2 items 
 (height 150, width 150)",  that is a 2 Ranks Nozzle with 
 6 Images on 2 Lines,  that is 12 images, everyone of the 
 size of Height 150 x Width 150 Pixels. 

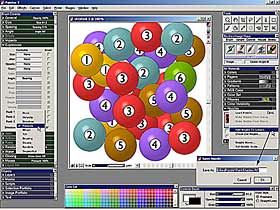
But  the True Paradox  is if you take everyone image  and  resize it or cut it to a perfectly 
divisible measure,  for example to 300 x 250 Pixels  and  then click on File/Info  and  write 
exactly this String "image hose 3 by 2 items (height 125, width 100)",  and then save it with 
File/Save in format.RIF.  If therefore  you load it again,  but with Brush:Nozzle/Load Nozzle 
(CTRL+L), you will have created in a few a 2 Ranks Nozzle, even if it will be rudimentary and 
if in the most part of cases it will be practically unsuitable! Just try it!!! 
PART III: Rank 3 Nozzles
Also  in order  to create a Nozzle to 3 Orders,  you must proceeded in a similar, but lightly 
different way.  A 3 Ranks Nozzle foresees 3 different Factors  of Input for the Management of 
the Nozzle  and  it is taken advantage of the Dimension of the Horizontal and of the Vertical 
Deployment  and  also of the Continuation of That Vertical Deployment,  considering the whole 
first 2 Ranks Nozzle  as the unit to vertically repeat,  in order to determine the membership 
of a Cell of a Nozzle to One or to the Other Rank,  so that it can be possible to manage them 
with One or the Other Factor of  Input. The 1 Rank Nozzle refers to the Horizontal Deployment 
and  the 2 Ranks Nozzle  refers  to the Vertical Deployment,  while  the 3 Rank Nozzle refers 
instead  to the Continuation  of Vertical Deployment,  that is  the one of the first 2 Ranks. 
The Method of Creation of a 3 Rank Nozzle is following:  
24 - Open   a  new  image   with  File/New (CTRL+N),  of 
Width=900 x Height=300 Pixels size. 
25 - Repeat  the instructions  from Point 14 to Point 17 
of this Tutorial. 
26 - Click in Objects/Layers/Drop and Select. 
27 - In order  to create  the Third Order of the Nozzle, 
now  you  must decide  how many Elements  the Third Rank 
should have.  The Nozzle is set up to 6 Elements for the 
First Rank  and  2  Elements  for  the Second Rank.  You 
decide  for example  to create  2 Elements for the Third 
Rank.  So you must repeat for 2 Times the first 2 Ranks.
Image15
28 - Measure the Vertical Size of the 2 Ranks Nozzle.  In this example it is 300 Pixels High, 
so it must be multiplied for 2 and transformed to 600 Pixels High. 
29 - Always with the 2 Ranks Nozzle Set up  and with the Active Selection, as at point 26 (If 
the Selection is disabled, then click on Select/Reselect),  click with mouse on Select/Float. 
Image16
 30 - Click on Edit/Copy (CTRL+C). 
 31 - Select and Activate the Canvas Layer  and  Click on 
 Canvas/Canvas Size,  in order to change only the Size of 
 the Background or Canvas, without altering the images in 
 the other levels. Add 300 Pixels only in "Add ... Pixels 
 to Bottom". 
 32 - Click on Edit/Paste (CTRL+V) and create the Layer 2 
33 - Click  for 2 times  quickly  with your mouse on the 
Name of Layer 1, or Select Layer 1 and Click on Objects/ 
Layers/Layer Attributes.  Write,  on a separate sheet of 
paper,  2 Values  of those  that  you see  in this Layer 
Attribute Window,  that is  the Top Value=10 and the Lef 
Value=7. 
Image17
Image18

 34 - After, Click 2 times quickly with your mouse on the 
 Name of Layer 2, or Select Layer 2 and Click on Objects/ 
 Layers/Layer  Attributes.   In  this  Layer 2  Attribute 
 Window,  insert  in Top  the Value  you  saw  in Layer 1 
 Attribute Window,  that is 10,  but now added to 301, as 
 the Size of the Nozzle  on which  you are working is 300 
 Pixels High, so you must add in Top the Value of 311 and 
 in Left,  on  the contrary,  you must  insert  the exact 
 value  of  the Layer 1  Attribute Window,  that is 7. In 
 this  way  the Second Element  of the Third Rank  is now 
 perfectly aligned under the First Element of Third Rank. 

35 - With Effects/Tonal Control/Adjust Colors/Hue Shift, 
Modify  the Colors  of this Second Element  contained in 
the Layer 2. 
Image19
Image20

 36 - Select with the mouse, and with Key SHIFT down, the 
 Layers 1 and 2 and then Click in Objects/Layers/Drop and 
 Select. 
 37 - Click on File/Save As  and  Save  the Image of your 
 Nozzle with the name of "Nozzle3Ranks.RIF". Don't Forget 
 to save always in Format ".RIF". 

38 - Close all the images you still have on your Desktop 
and Click on Brush/Image Hose.  Choose the Brush Variant 
you like more. Click on File/New (CTRL+N) and  so open a 
new File of 500x500 Pixels size.  Then Click on Brushes/ 
Nozzle/Load Nozzle and load the Nozzle you've just saved 
that is " Nozzle3Ranks.RIF ". 
Image21
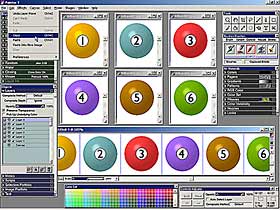
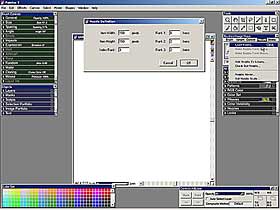
39 - Now on your desktop  it will be opened  a window where you must insert the Width and the 
Height  of  every Cell  of the Grid (Item Width=150 and Item Height=150),  the Number  of the 
Ranks that has the Nozzle, in this case 3 (IndexRank). Finally for every Rank you must insert 
the number of interested Cells,  so,  for this example, in the Rank 1 (Horizontal) Square you 
must insert the Number 6, in the Rank 2 (Vertical) Square you must insert the Number 2, while 
in the Rank 3 (Vertical Extended) Square you must insert the Number 2. Click on OK. 

Image22
 40 - The 3 Ranks Nozzle is created and is already active 
 in memory, but as for Default (Adopted a position Value) 
 is enabled  only  the Rank 1,  in order  to render fully 
 working  also  the Ranks 2 and 3,  go in Brush Controls/ 
 Expression  and set Rank 2  and  Rank 3 on Random, or on 
 Velocity, or on Direction, or on Pressure, or on another 
 of the possible options.  Go finally  with your brush on 
 the new image  and  begin to paint with your new Nozzle! 
 Now you can Add  the New Nozzle in permanent way to your 
 Nozzles  Library  with  Art Materials/Nozzles/Add Nozzle 
 To Library.  You  can  execute  in a more easy way  this 
 part of Tutorial, downloading the file nozpic03.zip with 
 all images,  clicking here on the Right Icon Download .zip. 
41 - It is possible  also  to  start  directly  from  a previous 2 Ranks Nozzle, in this case 
"Nozzle2Ranks.RIF ", in order to create a 3 Ranks Nozzle.  You must first select the Elements 
of the 2 Ranks Nozzle,  before with Tools/Magic Wand  and  after with Select/Invert. Then you 
must start from Point 27  and  repeat  the instructions  of this tutorial  until Point 39. At 
last you must click on File/Get Info and in the Window where it is written "image hose 6 by 2 
items (height 150, width 150)",  you must change it  and  write "image hose 6 by 2 by 2 items 
(height 150, width 150)", so that it becomes a full 3 Ranks Nozzle. 
PART IV: Make Nozzle from Movie
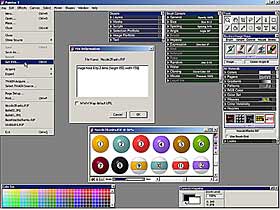
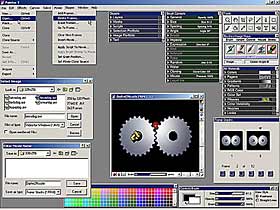
It's possible to create a Nozzle from a Movie too, with Brushes:Nozzle/Make Nozzle from Movie. 
This is  a rarely applied procedure,  but  it deserves however a mention  in this my tutorial. 
42 - Load with File/Open an Animation ".MOV" (Quicktime), 
or  ".AVI" (Video for Windows).  A windows will open with 
within all the images  of single Frames of the Animation. 
With Movie/Delete Frames  cancel  all  the Frames  except 
the ones  you think  you will need in order to create the 
Nozzle  from the Movie.  Leave,  for  example  12 Frames. 
Image23
Image24

 43 - Select after Brushes/Nozzle/Make Nozzle from Movie. 
 In the Desktop  it appears  an image with all the frames 
 that  you had chosen  from the Movie. Saves it as a File 
 ".RIF" with the name of "NozzleFromMovie.RIF". Close all 
 the open images  on Desktop.  Click on  Brush/Image Hose 
 and  choose  the Brush Variant  you like more.  Click on 
 File/New (CTRL+N)  and  then open  a new file of 500x500 
 Pixels size and Click in Brushes: Nozzle/Load Nozzle and 
 in the relative Window select the File of the Nozzle you 
 have just saved, that is " NozzleFromMovie.RIF " and you 
 can now begin to paint with your new Nozzle!
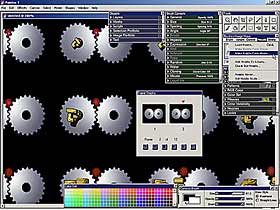
44 - It is possible  also create a 2 Ranks Nozzle  from a Movie.  The procedure is almost the 
same  of the one  in order to create  an 1 Rank Nozzle,  only you must use  an Animation that 
repeats the Frames of the First Rank,  copying and putting them under of first ones, changing 
for example their Color.  Do not leave Empty Frames at the end of Animation.  You must create 
the Nozzle  as the one with 1 Rank.  Therefore select File/Get Info  and in the Windows where 
for example  it is written "image hose 6 items (height 125, width 100)",  write "image hose 3 
by 2 items (height 125, width 100)" in order to make it a full 2 Ranks Nozzle. 
Indietro
 
Avanti

I have written this page in Italian language and after I have translated it in English language.
If you find some my translation's error, excuse me and send me an e-mail with the correct version. Thanx !!
Please Remember That Everything On This Web Site Is Copyrighted.


All rights reserved. Copyright © 2000 by Francesco Franceschi.